Uniform Mitigation Verification Inspection Form OIR-B1-1802 (Rev. 04/26) Adopted by Rule 69O-170.0155, F.A.C. Page 1 Section 4 — Roof Covering (Part 1 of 2)
Section 4 — Roof Covering (Part 1 of 2)
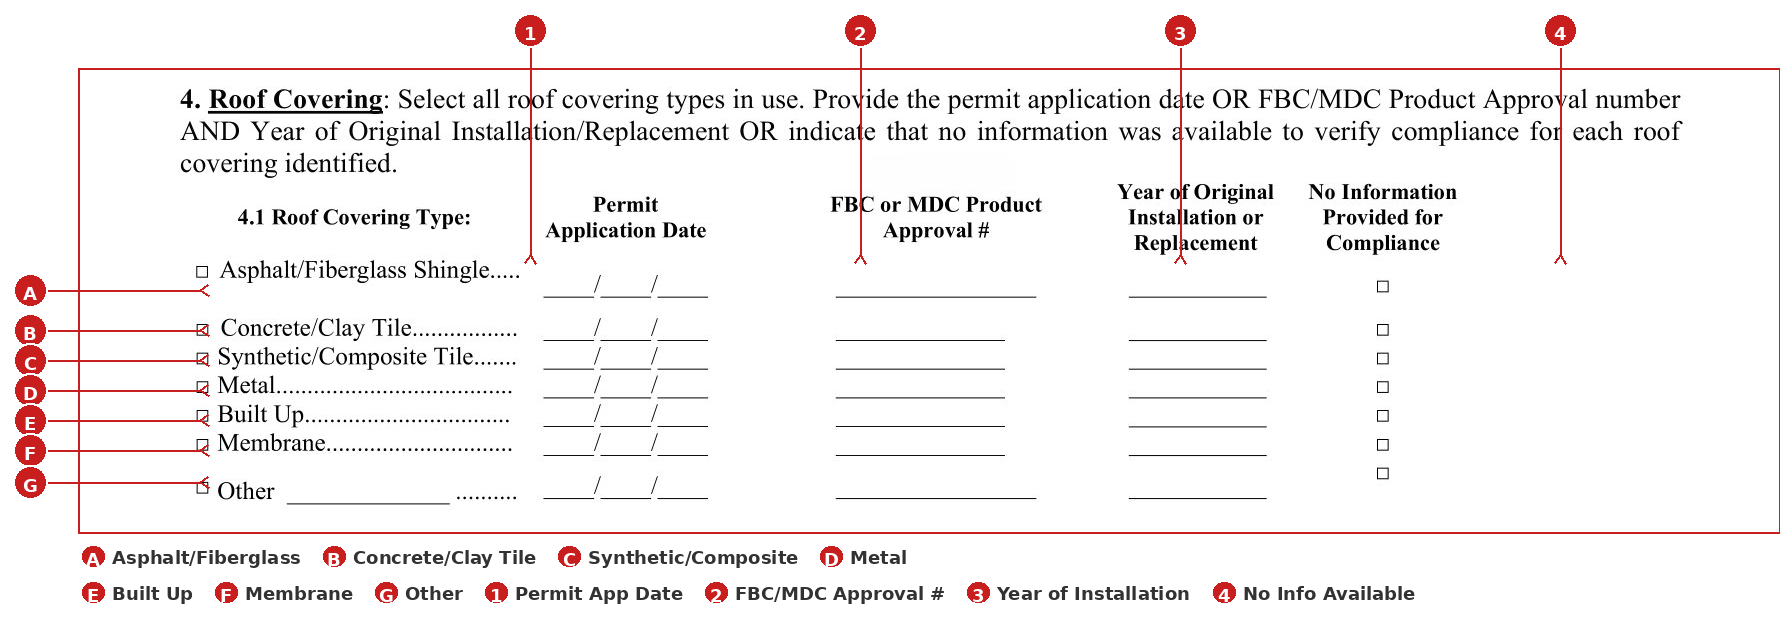
Section 4 documents what type of material is covering your roof and whether that material meets the compliance standards required to qualify for an insurance credit. This is one of the more detailed sections of the form, and it is structured as a grid — each row represents a roof covering type, and each column captures a different piece of supporting information for that material.
What the Inspector Is Documenting
The first step is simply identifying what type of roof covering is present on the home. The form lists the most common material types, and the inspector checks all that apply — it is possible, for example, to have a tile roof on the main structure and a membrane or metal section over a flat addition or porch area.
Here is a plain-language description of each roof covering type listed on the form:
- Row A — Asphalt/Fiberglass Shingle — The most common residential roof covering in the United States. These are the familiar overlapping shingles seen on most traditionally styled homes. In Southwest Florida, asphalt shingle roofs are common but less dominant than in other parts of the country, where the heat, UV exposure, and hurricane risk make other materials more popular.
- Row B — Concrete/Clay Tile — One of the most common roof types in SWFL. Concrete tile is extremely prevalent in this market, particularly on homes built in the 1990s and 2000s. Clay tile, while similar in appearance, is a higher-end product. Both are heavy, durable, and when properly installed, perform well in high wind conditions.
- Row C — Synthetic/Composite Tile — A newer category of roofing material that mimics the look of tile or slate using polymer or rubber-based materials. Lighter than concrete or clay, these products have grown in popularity as an alternative to traditional tile.
- Row D — Metal — Metal roofing has seen significant growth in Florida in recent years, particularly in the wake of major hurricanes. Standing seam metal roofs in particular are regarded as among the most wind-resistant options available. Metal is durable, lightweight relative to tile, and often qualifies for favorable treatment across multiple sections of the wind mitigation form.
- Row E — Built Up — A multi-layer roofing system typically used on flat or very low-slope commercial roofs, consisting of alternating layers of bitumen and reinforcing fabric. Less common on residential properties but occasionally seen on flat-roofed homes or additions.
- Row F — Membrane — Single-ply or adhered membrane roofing systems, also typically used on flat or low-slope sections. Common on modern construction with flat roof profiles or covered patios and additions.
- Row G — Other — A catch-all for any material not covered by the categories above, with space for the inspector to specify what it is.
The Four Columns — What the Inspector Fills In
For each roof covering type that is present, the inspector must provide at least one of the following pieces of supporting information:
- Column 1 — Permit Application Date — The date the building permit for the roof installation or replacement was applied for. This is typically pulled from county public records. For the Cape Coral and Fort Myers area, this information is usually accessible through the Lee County or Collier County permit portals, though older permits may not be digitized.
- Column 2 — FBC or MDC Product Approval Number — The Florida Building Code or Miami-Dade County product approval number for the specific roofing material installed. This number confirms that the product was tested and approved to perform to a defined wind resistance standard. Inspectors can look this up through the Florida Building Commission’s product approval database if a permit is not available. Inspectors will often place the roofing permit number in this place as well.
- Column 3 — Year of Original Installation or Replacement — The year the roof covering was installed or most recently replaced. This is used in conjunction with the permit date or product approval number to establish a timeline for the roof.
- Column 4 — No Information Provided for Compliance — If none of the above information is available, this box is checked to indicate that compliance cannot be verified for that particular covering. Checking this column does not disqualify the home from other credits, but it does mean that no insurance credit will be applied for the roof covering section on that specific material.
What This Means for Your Insurance
To receive a credit for roof covering, the inspector needs to be able to document that the material on your roof was installed under a permit, carries a qualifying product approval number, or both. Roofs installed without permits, or where no documentation exists, may still be photographed and described, but the credit for that section will not apply. This is one of the areas where having your roofing contractor’s paperwork — even just a receipt or proposal that lists the product approval number — can make a meaningful difference.
A Note on Permit Records
The inspector will typically attempt to pull permit information through county public records portals. In Lee county, these records are generally available online through the online permit portal for your county / city. Unfortunately, online permit portals are not always fully up to date. If you have original construction documents, a survey, or a closing disclosure that references the permit application date, having those available can be helpful, particularly for homes that fall near one of the cutover dates mentioned above.
IMPORTANT NOTE: If you work in law enforcement or another profession that qualifies for address privacy under Florida law — or if you have your property records restricted from public access for any reason — your permit information will not be visible to the inspector through online county or city permit portals. If this applies to you, you will want to have your permit documentation ready before the inspector arrives, or send it ahead of the appointment if possible. This will allow the inspection to be completed accurately and without delay.
Return to the Main “Understanding the Wind Mitigation Inspection Form” Page